2014/05/07

Pleated Skirt (No. 3)


Yes. A pleated skirt. Again.. But after kind of botching the last two, I thought I needed to give it another try. Saw the fabric on the last fabric market I went to in March and it basically screamed "pleat me!", so I did.

It actually turned out quite a bit better than my last two attempts I think, though of course it also does have its construction mistakes. Maybe you remember the Black Pleated Skirt I made and how it all kind of fell apart with the zipper in the back. I was kind of scared I'd make the same mistake again this time around, so I tried to think of a way around it. I found one, but it kind of only looks good in theory. Instead of actually closing the back of the skirt with the zipper, I sewed in the zipper and folded a pleat on top, so it looks like the skirt is actually closed with just a button
and you can't see the zipper at all.


When you wear the skirt, though, that pleat always sticks out a little, so not only does it look a little weird, you can actually see the zipper and the seam from one side. So my clever thinking wasn't as clever as I thought after all. Maybe I need to press it a little more, but I actually like the fact that the pleats aren't pressed. Anyway. It's wearable as long as the top you wear with it is long enough. It still looks a lot better than the last one did.


Next up: another top, which concludes the Easter sewing session. I have about half a dozen dresses planned next, so let's see how that'll go.

2014/05/01

Collared Top (....oh, and happy 1st blogaversary to me)


Wow. I can't believe it's been a year already, but: today is actually my blog's first anniversary. I can't say I've actually accomplished what I've set out to do in the past year, but unfortunately real life got in the way more often than not. I thought I'd post more often, I thought my photography skills would actually improve a little over time and I thought I'd sew and bake a lot more than I actually did. Well, that didn't happen. But maybe it will this year. No promises, though. ;)

Anyway. Instead of celebrating with a cake, I'm celebrating with some sewing projects. On Easter I actually had a long weekend (my first actual free weekend since Christmas!), so I used the time for a sewing marathon. Considering how slow I am, I didn't manage to get as much done as I wanted, but I'm still happy with what I've accomplished, even though all of the pieces I made had a dozen couple of maaaaaajor minor construction mistakes (well it's me, what did you expect?).

This one I love though, despite its numerous flaws. I made the pattern myself (....which probably explains a lot....) and I'm in love with the fabric, even though it wrinkles as soon as you look at it the wrong way. The neckline is a little deeper than I had planned - which looks good I think, but also means I will never be able to bend over wearing that top because you can literally see through to my shoes if I do. It was also my first attempt at making cap sleeves and while I think they turned out alright, I think I also learned what to do better next time around. I'm still contemplating hemming the neckline on the back with some bias tape (because I kind of botched it a little while sewing), but I'm not sure how to actually do that without having to re-open the shoulder seams. So I'm a little scared of doing more harm than good.


I'm also a big fan of the collar. I have a dress with a similar collar that I've tried to replicate, though this one turned out a lot bigger than the one on my dress. At first I was a little afraid that it would look a little weird when you wear it (I kind of expected it to look like a bib), but it actually curves perfectly around the bust (Heh! I love it when stuff works out without me having to do anything.) So now it just needs to get a little warmer outside so I can actually wear it.


Alright. I'm off to the fabric market (...not that I actually NEED new fabric considering I have enough for the next...dozen projects at least still lying around here). Got vacation time coming up at the end of May - I see another sewing marathon in my future!

2014/03/18

Bailey's Tiramisu Cake


So the other day at work, two colleagues and I invited our department to a little birthday celebration (I know, the celebrations won't end. And I wasn't even that fond of becoming a year older.), so I had to bake my...third birthday cake. (It's the last one, though, I swear.) I was a little undecided on what I wanted to do, but in the end I got "nudged" to do the tiramisu cake (the original recipe is from "Sugar & Everything Nice", but I've adapted it quite a lot to my taste over time). I've made that cake a few times before and it's usually gone within a few hours, no matter how many or few people are around to eat it. I count that as a win. If you don't like Bailey's, of course you can substitute that with whatever liqueur you like (or leave it out at all and use only hazelnut syrup instead), but I'm not a big fan of Amaretto or Kahlua, so I usually exchange these for Bailey's in every recipe I come across one of them. In this case I used hazelnut Bailey's, because I wanted the cake to have a bit of a nutty flavor and added some praline spread to one of my layers for the same reason (see tip at the end of the recipe).


Bailey's Tiramisu Cake


For the cake:
360g all-purpose flour
120g cornstarch
4 tsp baking powder
1/4 tsp baking soda
1/2 tsp salt
300g softened butter
300g sugar
6 large eggs
2 large egg yolk
3 tsp vanilla extract
360ml buttermilk

For the Espresso Syrup:
2 tbs instant espresso powder
2 tbs boiling water
120ml water
75g sugar
2 tbs Bailey’s

For the filling:
250g mascarpone
200g sour cream
200ml whipped cream
150g powdered sugar
2 tsp vanilla extract
3 tbs Bailey’s
2 tbs hazelnut syrup (optional)
50-100g grated milk chocolate


Cake:

1. Sift together the flour, corn starch, baking powder, baking soda and salt. Set aside.

2. Beat the butter until it’s creamy. Add the sugar and beat for about 3 minutes.

3. Add first one egg at a time, then an egg yolk at a time, beating the batter about a minute after each addition.

4. Add the vanilla extract.

5. At medium speed, add the dry ingredients and the buttermilk in 5 parts, starting and ending with the flour mix.

6. Divide the batter between two spring pans (26 to 28cm) and bake at 175°C for about 30 minutes.

7. Let the cakes cool completely, then cut each of them into two layers of the same height, giving you a total of four layers.


Espresso Syrup:

1. Dissolve the espresso powder with 2 tbs of boiling water.

2. Bring the water and sugar to a boil in a small saucepan.

3. Transfer to a bowl and stir in the Bailey’s and 2 tbs of the espresso. (Keep the rest of the espresso, we’re going to need it later on!)


Filling:

1. Put the mascarpone, sour cream, vanilla extract, Bailey’s and hazelnut syrup in a bowl and whisk until well combined.

2. Sift the powdered sugar over the mix and whisk again until combined.

3. Whip the cream to stiff peaks and fold into the mascarpone-mix.

4. Transfer about 300g of the mix to separate bowl and add some of the leftover espresso syrup to taste (and some hazelnut syrup if you want). This will be our frosting.


Assembling the Cake:

1. Soak the bottom layer of the cake with espresso syrup (just sprinkle it on with a tablespoon or brush). The cake should be fairly dense, so don’t be timid (like I always am because I’m afraid the cake is going to turn into mush), it can take quite a bit of syrup before it actually soaks through.

2. Spread some of the mascarpone mix on top (about 1 to 2cm thick) and sprinkle some grated chocolate on top.

3. Repeat with cake layer two and three. Then put the last layer on top without soaking it in syrup.

4. If you have any filling left after you’re done filling the cake, just mix it in with the frosting.

5. Frost the outside of the cake with a large spatula.

6. Decorate however you like (I used chocolate coffee beans around the sides and grated chocolate on the top).

7. Refrigerate for at least 3 hours or overnight if you want the flavor to really set in.


Tip: If you want your cake to have that little bit of extra chocolate or hazelnut flavor, you can also spread a thin layer of nutella or praline spread onto the inner two layers of cake before adding the mascarpone mix.

Enjoy!
♥ Nicole

2014/02/20

Multivitamin Cake (gluten-free)

A few weeks ago, a colleague from work had her birthday and since I’ve realized that generally people aren’t as addicted to sugar as I am, I wanted to make something for her that wasn’t as sweet as my usual stuff. So I unearthed this recipe, which I hadn’t made in years. At first I thought I had written down the recipe wrong, because there was no flour in it, but then I realized: it’s just gluten-free! Added bonus, really, as there are some people at work who always miss out on cake because they’re allergic. I tweaked the recipe a little to add a little more “whomp” to it….and liked it so much that I made it again for my own birthday a few weeks later (I told you I celebrated twice because of…reasons). So if you’re looking for something not too sweet and gluten-free but still totally delicious – you’ve come to the right place.


You can decorate this however you want. You probably wouldn’t have realized the two cakes I made were the same until you cut them (which was mostly because I screwed up my piping on the first cake and had to, yes, improvise), so feel free to try whatever you want on that. The first cake I made wasn’t decorated at all around the sides, because I had to transport it to work and I like to that in a spring pan, so I concentrated on (and screwed up) the top. Since my birthday cake wasn’t going anywhere, though, I concentrated more on the sides. The original recipe calls for a layer of cream and some advocaat (which is basically spiked eggnog, just nastier) to be sprinkled over the top, but I hate that stuff, so I never do it. I could go for the eggnog version, though, if you make it around Christmas.

And another note: The cake recipe is supposed to be for a 28cm spring pan, but to be quite honest: I usually take 1.5 times the recipe if I use a large spring pan to give it a little more height. You don’t need to double the filling, though.


Multivitamin Cake (gluten-free)

For the cake:
200g almond meal
100g white sugar
100g chocolate chips
80g butter
5 eggs
1 tsp baking powder (make sure it’s gluten free if you want the recipe to stay gluten free)
1 tbsp rum (optional)

For the filling:
about 100-150g canned mandarins (one small can should suffice; don’t use fresh ones)
500g quark
100g sugar
200g whipped cream
2 p. (about 15g) vanilla sugar (alternatively: ½ tsp vanilla extract)

For the topping:
½ l multivitamin juice (if you can’t get any: take orange, passionfruit or mango juice)
100g whipped cream
1-2 ripe bananas
3 p. (about 45g) white clear glaze (for the Germans: Tortenguss; if you can’t get that, use 1 p. = 15g or 6 sheets of gelatin)
1-2 tsp lemon juice


1. Preheat your oven to 180°C.

2. Line the bottom of a spring pan with baking paper and lightly grease the sides.

3. Divide the egg whites from the yolks and whip the egg whites to stiff peaks, adding about 20g of sugar while you whip.

4. In a separate bowl, cream the butter and slowly add the egg yolks, sugar, baking powder, almond meal, chocolate chips and rum, beating the batter well after each addition.

5. Fold the egg whites into the batter.

6. Bake for about an hour or until a toothpick inserted in the middle comes out clean.

7. Let it cool completely before cutting it into two layers.


8. Whip the cream, adding the vanilla sugar as you go. Set aside. (If you use vanilla extract, don’t add it to the cream, add it in the next step to the quark.)

9. Mix the quark and sugar until it’s well combined. Fold in the whipped cream.

10. Drain the mandarins and dry them as best as possible using some paper towels. Then fold them into the quark mix.

Please use a cake ring for these next parts:

11. Spread the quark mix onto the bottom layer of the cake and put the second layer on top.

12. Cut the banana(s) into equally thick slices (about ½ cm) and sprinkle some lemon juice on top. Arrange them evenly on the top layer of the cake (leave about 1-2 cm space on the outer edge).

13. Put the juice in a pot and add the clear glaze. Bring to a boil, constantly stirring the mixture. (If you use gelatin: heat up the juice, but don’t let it come to a boil. Take it off the stove and add the gelatin. Stir until dissolved.)

14. Pour the juice on top of the bananas. (This is why it’s important to use a cake ring.)

15. Let the juice cool down a little, then put the cake into the fridge until the juice has thickened.

16. Decorate however you like!


Enjoy!
♥ Nicole

2014/02/18

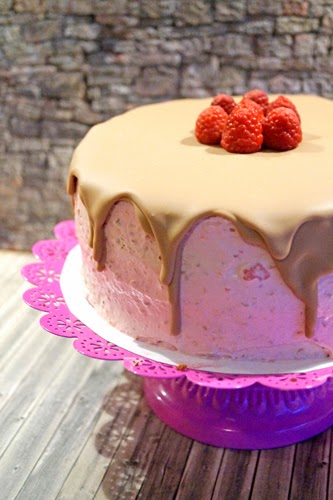
Chocolate Raspberry Cake (a.k.a. the botched Kinderriegel Cake)

So last week…or the week before…no idea anymore…I celebrated my birthday for the second time (not that I’m still at an age where your birthday is something you look forward to) and I wanted to make one of my all-time favorite cakes: a Kinderriegel Gateau. You know Kinderriegel? Milk chocolate bars with a milk center? Heavenly. And the cake seriously tastes just like the bars. Love it.


But knowing me, you all know what comes next: Right. Didn’t work out the way I planned it, because for some reason, my chocolate cream curdled. Which it has never done before. Sometimes I really wish I knew more about how baking worked so I actually knew why this stuff keeps happening to me so I can avoid it in the future.

Anyway. So, I had to improvise (really, this blog should be called “A study in improvisation” or something). Fortunately, I still had some stuff at home to make a raspberry cake out of the chocolate cake and that one at least turned out rather yummy if I’m allowed to say so myself.


Raspberry Chocolate Cake (with a hint of Kinderriegel)


For the cake:
150g all-purpose flour
150g white sugar
150g butter
1 p. vanilla sugar (if you don’t have any, use ½ tsp vanilla extract)
100g melted chocolate (in this case: Kinderriegel if you have access to them)
6 eggs
2 tbsp. dutch cocoa
2 tbsp. baking powder

For the raspberry filling:
400g sour cream
500g quark
100ml whipped cream
100g white sugar
3p. vanilla sugar
3-4 cups of raspberries (fresh or frozen)
gelatin (6 to 8 sheets or 1 p. of gelatin powder)


For the decoration:
a few raspberries
about 100-140g of melted (milk) chocolate (5-7 Kinderriegel)


1. Beat the butter with an electric mixer until it’s light and fluffy. Slowly add half of the sugar, the vanilla sugar, melted chocolate and cocoa and mix well after each addition.

2. Add two whole eggs and four egg yolks.

3. Mix the flour and baking powder and add slowly.

4. Whip the egg whites to a stiff peak, slowly adding in the rest of the sugar, and fold into the batter.

5. Line a spring pan (28cm) with baking paper on the bottom and use some cooking spray or butter to grease the sides lightly. Pour in the batter.

6. Bake on 180°C for about 40 minutes or until a toothpick inserted into the middle comes out clean.

7. Let the cake cool for half an hour, then cut it into two layers.


8. Beat the cream to stiff peaks.

9. Put your raspberries through a food processor, leaving a few aside for decoration (I used frozen raspberries, so of course I had to thaw them first). I don’t mind eating raspberry seeds, so I didn’t do anything else, but if you don’t want the seeds in your cake or are looking for a smoother finish when frosting the cake, strain the raspberries through a sieve after puréeing them.

10. If you don’t have gelatin that works on cold liquids, warm up your raspberries (in a microwave or on the stove) and add the gelatin, stirring constantly until it’s completely incorporated. If your gelatin works on cold liquids, you can stir it in without having to warm up the raspberries.

11. Beat the quark and sour cream with an electric mixer, adding the sugar and vanilla sugar while beating.

12. Add the raspberries to the quark and beat until well incorporated.

13. Fold in the cream (if you had to warm up your raspberries, wait until the mix has cooled down a little).


14. Spread about 2/3 of the cream onto the bottom layer of the cake and put the second layer on top. Use the rest of the filling to frost the outside of the cake. If you feel like your filling isn’t firm enough to frost the cake immediately, put the cake into the fridge for an hour or two before you start frosting.

15. Put the cake into the fridge for a couple of hours so the filling and frosting can set properly.

16. Melt the chocolate, but let it cool down until it starts to thicken again before pouring it over the cake. Use an angled spatula to even it out if necessary.

17. Decorate with some raspberries or whatever else you like.


Enjoy!
♥ Nicole

2014/01/14

Pleated Skirt (no. 2)


So, another pleated skirt. Did I mention I'm kinda obsessed with them lately? This one was my second try...and kind of my first as well. I saw this great velvet needlecord online that looked so great, I was already imagining etui dresses in my future. However, when it got here...well, it kind of looked more like the upholstery of a fairly ugly couch. So. Definitely not dress material. However, since I already had it, I needed to to something with it. Hence: skirt.

My first try turned out great. The pleats looked great, the waistband got a little thick, but I could have lived with that and the fabric actually didn't look too bad once you saw the finished product. However, one of the pleats always draped differently than all the other ones. At first, I didn't really think anything of it, but when I put the skirt on my dress form before putting the zipper in, I realized what had happened. My one big mistake. Apparently, I had mixed up one of my markings and one pleat was only half as deep as the others. Which is why it draped so differently. Even though it's not even that obvious, the minute I knew about it, I knew I would never wear the skirt. So I didn't even finish it, but started over.


My second big mistake. Because for some reason, I didn't drape the pleats at an angle, as I had done with the first skirt. And which was what had made the skirt look so nice in the first place (it gave it a really nice A-line). And since I hadn't really tried in on before I finished it (well, I knew all the measurements from my first attempt), I only realized when I put it on (after I was finished with it) that the beautiful A-line skirt I had planned on actually clings to my thighs and doesn't look anything like attempt number one.

*insert defeated sigh*

So I guess that's gonna be another skirt I won't be wearing anytime soon.

You know, for once I would actually like to sew something and not have to talk about the 20 mistakes I made that ruined the whole thing.

If I ask for some talent for my birthday, you think I'll get it?

2014/01/04

Pleated Skirt


So over the past few weeks I've kind of been a bit obsessed with pleated skirts and dresses. This one was actually my second (...or rather, third) attempt at one (you're gonna see attempt number 1-slash-2 sometime this month) and it was actually supposed to become a dress (which explains why it has a 10cm wide waistband now...), but me being me I just started without a real game plan and when it came to figuring out a top I kind of failed. But the way-too-wide waistband (which was actually supposed to be a bridge between the skirt and the top) was already halfway attached and I was too lazy to start over so it stayed on.


Anyway. I had accidentally figured out the exact width my pleats needed to be so that they would match up perfectly in the back (really, complete accident, because I didn't measure a d**n thing before I started) and I was so proud of myself and imagined how perfect it would look and how you wouldn't be able to see the zipper........and I should have realized things are never that easy when I am involved. So of course, I completely messed it up. Big time. Again.

When I complained about my lack of sewing talent to a friend the other day, she said "I don't think sewing involves talent. It's mostly practice." Well, I don't quite believe that, but in moments like these, it's a nice sentiment at least.


I guess I'll just never wear it with anything tucked into it...lol (And by the way, the hem isn't as lopsided as it looks on the picture! It's actually quite straight.) But overall, I like this pleat thingie. Definitely gonna make a similar one again.

In other news: I actually managed to finish the second Peony dress. Jersey needle and silk thread did the trick. Either I'm completely cross-eyed, though, or it turned out kind of asymmetrical. Knowing me, it's the latter. I think I'm actually gonna throw a party if I ever finish something I deem up to standard...lol

Got the pattern for Sewaholic's Cambie dress this week as well and I'm planning on making it out of dark red satin and black lace. Let's see how many mental breakdown's that project is gonna involve...