2013/12/06
The 12 days of Christmas Cookies: Day 4 - Lemon Wreaths
So, last night the storm that was supposed to hit yesterday finally hit us. It got nowhere as bad as they said it would be, but this morning I made it exactly as far as my subway stop and then turned back. So, unplanned extra-long weekend. I'll take it. Of course, I didn't get anything done yesterday or today (now that I finally had the chance to actually get something done for once), but eh. Whatever.
So day 4 today and it's a simple but really tasty cutout cookie. It's lemony, the icing works for me for once and I could finally use some of my about 40 different types of sprinkles that I seem to have amassed over the last year or so.
Lemon Wreaths
For the cookies:
120g all-purpose flour
90g cornstarch
1 tsp baking powder
a pinch of salt
125g softened butter
110g white sugar
2 egg yolks
5 tsp lemon peel
For the icing:
250g powdered sugar
3 tbsp lemon juice
1 tsp vanilla extract
3 tbsp milk
1. Mix the flour, cornstarch, baking powder and salt. Set aside.
2. With a hand mixer, beat the butter and sugar until light and fluffy. Add the egg yolks one at a day, beating each one for about a minute. Then add the lemon peel and the flour mixture. Mix until well combined.
3. After the dough has come together, knead it for a minute with your hands until it's not sticky anymore.
4. Cover in clingwrap and put into the fridge for at least an hour.
5. Preheat your oven to 175°C. Take the dough out of the fridge and roll out very thinly, about half a centimeter in thickness. Cut out wreaths.
6. Bake for about 12 minutes.
7. While the cookies cool down, mix the lemon juice, vanilla and milk with the powdered sugar. If the mixture is too thick add a little more milk at a time.
8. Dip the upper side of each cookie into the icing and decorate as desired while the icing is still soft.
Enjoy!
♥ Nicole
2013/12/05
The 12 days of Christmas Cookies: Day 3 - Vanillekipferl
I know, I know, I skipped a day. Believe me, that wasn't the last time this is gonna happen. Last night was due to laptop issues, though, meaning I give that thing another couple of weeks at most and then it's off to the trash bin. So instead of giving myself a shiny new lens for my DSLR for Christmas, as planned, I'm probably gonna have to give myself a laptop that'll set me back more than twice as much. Great. Merry Christmas to me.
Plus, we have a big storm coming in today (apparently the worst one since 1962), so my bosses told everybody to stay home from work just to be safe, so cross your fingers for me that everybody's completely exaggerating and it won't turn out as bad as the weather service says it will.
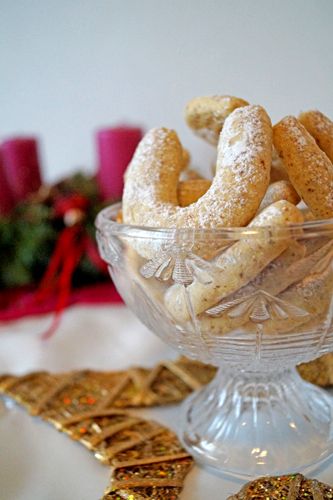
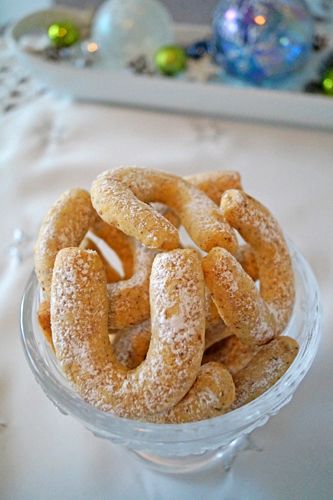
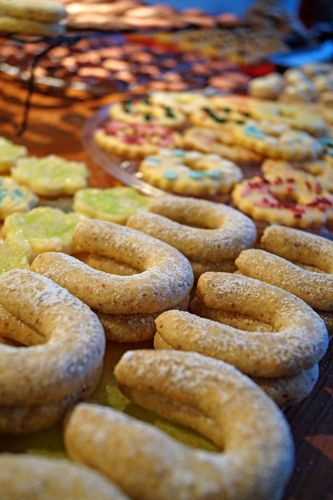
Anyway. On to better things. Vanillekipferl, for example. These are typical German Christmas cookies and no matter how often I make them, they will never not be delicious. You can taste the vanilla bean (Really, don't use a substitute on these, use the real thing. You'll thank me later.) and the powdered sugar gives them just the right sweetness. Mine always turn out huge (just as any other type of cookie I attempt), so the original recipe says it's for 140 cookies and I always end up with about...80 maybe? So plan accordingly. If you're completely capable of forming small cookies and you don't want to end up with 140, then maybe divide the recipe by half.
Vanillekipferl
300g all-purpose flour
140g white sugar
a pinch of salt
4 egg yolks
1 vanilla bean (scrape out the insides and discard the bean)
300g almond meal
300g softened butter
powdered sugar for dusting
1. Sift the flour onto your workspace (I usually work right on my kitchen counter) and make a hole in the middle of the flour. The sugar, salt, egg yolks and the vanilla bean paste go in there.
2. Evenly distribute the almond meal on the side of the flour as well as the butter, cut into small pieces. (Yes, it's a lot of butter. Yes, it's probably gonna cover the outside of your flour volcano almost completely when you're done. That's fine.)
3. With your hands, start kneading everything until you have a smooth dough. At first, it might seem like it won't come together and the egg yolk will stick more to your hands than to the dough, but after about 5 minutes, you should have a really workable dough.
4. Divide the dough into 4 parts and form 4 logs, about 4cm in diameter. Cover them in clingwrap (individually) and put them in the fridge for at least half an hour (an hour's better, though).
5. Line your baking trays with baking paper and preheat your oven to 200°C.
6. Take one of the logs out of the fridge and cut it into slices about a centimetre wide. Roll each slice into a small log (make sure the ends of the log are about as thick as the middle part of the cookies will burn on the sides) and then form a U-shape.
7. Bake for about 10 to 15 minutes (depending on how big your cookies turned out). The cookies aren't supposed to turn brown, so keep a close eye on them!
8. Once they've cooled down, dust with powdered sugar.
Enjoy!
♥ Nicole
2013/12/03
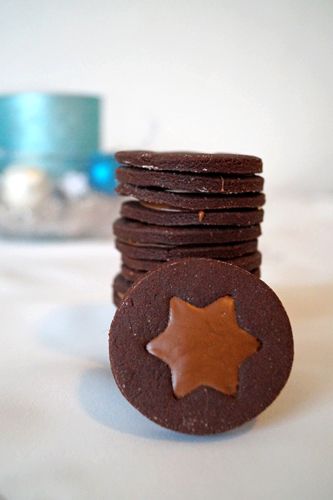
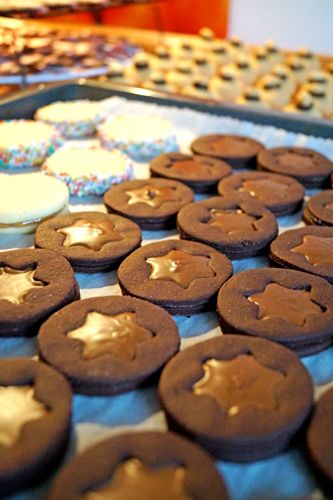
The 12 days of Christmas Cookies: Day 2 - Praline Coins
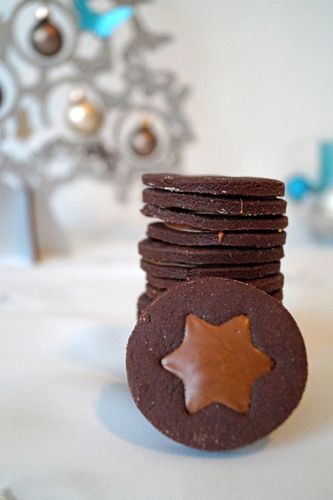
Another one of those things that I have a real sweet tooth for is what we Germans call nougat and what everyone else seems to call hazelnut praline (but to be honest, there's hardly anything sugary that I don't have a sweet tooth for.) For some reason, though, you only seem to be able to get the good stuff around Christmas and Easter, while throughout the year, most nougat-y goodness seems to vanish from the stores. So I always need to stock up around Christmas. Unfortunately, this results in stocking up on body fat as well, but hey - it's winter and I freeze easily, so there. Two birds, one stone.
So this year (after a somewhat botched attempt last year that I don't wanna talk about), I decided to actually make some cookies incorporating my beloved nougat-slash-praline and this is how it turned out.
Praline Coins
For the cookies:
250g all-purpose flour
50g sugar
50g dutch processed cocoa
1 egg
125g softened butter
50g dark chocolate
For the filling:
100g hazelnut praline
1. Melt the dark chocolate
2. Mix the sugar with the cocoa and, with an electric mixer, whisk together with the butter until well combined.
3. Add the melted chocolate and the egg and whisk for a minute or so.
4. Add the flour and mix until you have smooth dough (if you started mixing with your , you should switch to the dough hook before adding the flour). If it doesn't come together completely, knead with your hands for a couple of minutes.
5. Wrap the dough in cling film and refrigerate for at least half an hour.
6. Roll out the dough thinly and cut out circles (mine are about 5 or 6cm in diameter). Take one half of the cookies and cut out a star in the middle. Those are gonna be the cookies that go on top.
7. Bake for about 20 minutes at 175°C
8. Once the cookies have cooled down, melt the hazelnut praline in a bain marie.
9. Spread a dollop (a little less than a teaspoon) on each bottom cookie, but make sure it doesn't completely cover the cookie, but leave a little space around the outer edges.
10. Take a top cookie and press it lightly onto the praline mixture. Now the praline will spread to the outer edges (which is why it's important to leave a little space when spreading the praline).
11. Voilá!
Enjoy!
♥ Nicole
2013/12/02
The 12 days of Christmas Cookies: Day 1 - Peanut Sighs
I love Christmas. People who know me know this is very unusual for me, because usually I'm not one for holidays and traditions and all that sappy stuff that comes with it. However, when it comes to Christmas, I make an exception. There's nothing better than decorating your apartment (which I usually do come November 1), going Christmas shopping (which I'm usually done with by November 2), finally being allowed to listen to your extensive collection of Christmas songs without people looking at you weirdly (which I do as soon as the temperature drops below 5°C) and going for a walk in the snow while everything's lit up festively around you (yes, even I get sappy then). And baking Christmas cookies of course. I rarely ever bake cookies throughout the year, so I usually go all out around Christmas time.
This year, however, Christmas is stressing me out. Since I'm working seven days a week lately, I didn't have time to decorate until last Saturday and though I usually make my Christmas wreath from scratch, by last weekend I still hadn't gotten around to it, so I caved and bought a ready-made one (well, at least I "improved" it afterwards). I also had to decide whether to go Christmas shopping or bake cookies, because I simply don't have time to do both. So I did all my Christmas shopping online one night last week and decided to go for the cookies. Especially since I don't really get around to baking at all lately.
I was aiming for 12 different ones, but alas, I failed. One turned out horribly and went into the trash. One still sits unfinished in my kitchen (well, we might rescue those still. We'll see.). And after the other nine were done, I was done as well and simply had no patience or energy or time to do more. So instead of doing the twelve days of cookies, right now it looks like it we might only get up to 9. We'll see how it goes.
Anyway. Day 1 is one of my all-time favorites. As I'm sure I've mentioned before, I love peanut butter. So what better way to start this countdown than with peanut butter cookies that are quick, easy and delicious?
Peanut Sighs
For the cookies:
100g roasted, salted peanuts
150g all-purpose flour
100g softened butter
50g peanut butter (smooth or crunchy, as you like it)
50g white sugar
3 tsp vanilla sugar (if you can't get vanilla sugar where you live, use 1 tsp of vanilla extract)
For the decoration:
about 40 whole roasted, salted peanuts for decoration
about 50g dark chocolate, melted
1. Preheat your oven to 150°C
2. Grind the peanuts in a food processor or blender. (It's best to grind only small portions at a time, because the peanuts will form a solid mass once they're ground that can jam the knives in your processor). Mix the ground peanuts with the flour.
3. Combine the softened butter, peanut butter and sugar and whisk with an electric mixer until well combined.
4. Add the flour mixture (all at once) and whisk quickly until you get a homogenous mass.
5. Take a bit of dough and, with your hands, form small balls (for some reasons, mine always turn out at least 4cm in diameter - if you want bite-sized cookies, try to make smaller balls than I do.) and put them on a baking tray lined with baking paper.
6. Bake for about 20 minutes (the cookies aren't supposed to change their color or turn dark!).
7. Once the cookies are cooled, melt some dark chocolate, fill it into a piping bag and pipe a small dollop of chocolate onto each cookie. Lightly press a whole peanut into the chocolate.
Enjoy!
♥ Nicole
2013/11/19
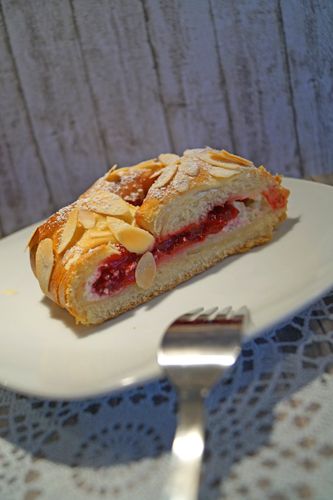
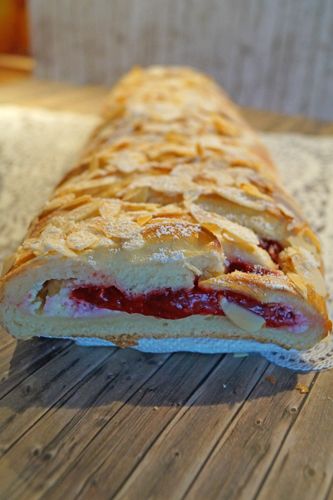
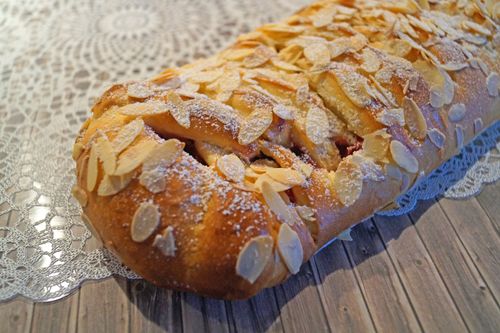
Raspberry Cream Cheese Braid
Argh, it's been over a month again since I posted. I'm sorry. But yeah, my three jobs are really keeping me busy lately. So I was actually really glad when I got the chance to bake something last week when a good friend of mine visited.
I saw this braid quite a while back on Toxo Bread (in the original recipe, it's a blueberry braid) and at first, I was a little put off, because there are quite a few steps involved and the dough has to rise four times. Yes, you read right. FOUR times. So definitely not something you're gonna do at the drop of a hat. There's gotta be some planning involved. But it looked so yummy that I broke down eventually and boy, am I glad I did.
Now let me tell you, yeast and I - we're not the best of friends, so usually I don't expect much when I start working with it. But I've made this braid about half a dozen times now and it's turned out beautifully every single time. I've tried different fillings (blueberry, raspberry, peanut butter, thinly sliced apples) and they've all been delicious (well, the peanut butter was a bit of a letdown, but all the fruity fillings were great), so you definitely can play around with that depending on what you like best. If you want to make it a little lighter, you can use quark instead of cream cheese; if you don't have fresh fruit, I'm sure you can use jams instead. So seriously, if you want something really, really great for breakfast (And dessert. And coffee. And maybe a little slice after dinner.) - try this. I know it's a little time-consuming, but you will not be disappointed. I'm kinda tempted to use this yeast recipe for everything now. I think I'll try cinnamon rolls next.
Raspberry Cream Cheese Braid
For the sponge:
1/2 tbsp active dry yeast
1/2 tbsp white sugar
180ml warm milk
120g all-purpose flour
For the dough:
1 egg
3/4 tbsp salt
40g white sugar
200-250g all-purpose flour
65g butter, softened
For the fruit filling:
150-200g raspberries (frozen ones are fine)
25g white sugar
15g cornstarch
1 tbsp lemon juice
For the egg glaze:
1 egg
1 tbsp milk
For the cream cheese filling:
200g cream cheese
2 tbsp white sugar
1/2 tsp vanilla extract
1 tbsp egg glaze
For the decoration:
50g sliced almonds
powdered sugar
1. For the sponge, mix the sugar, yeast and flour and pour the warm (not hot) milk over it. Mix with a spoon until you have a fairly smooth mixture. Let rise in a warm place for about 30 minutes.
2. Add the egg, salt, sugar and about half of the flour for the dough to the sponge and mix with an electric mixer (dough hook) until you have a smooth dough. Add the butter in small pieces and keep mixing with the dough hook until it's well incorporated. Keep adding flour until you have a working dough that's not sticky anymore, about five minutes (well, it can be a little sticky, but it should be workable).
3. Place the dough in a lightly greased bowl and let it rise in a warm place for about 2 hours, until it has doubled in size.
4. In the meantime, put your raspberries in a saucepan and add the sugar, lemon juice and cornstarch. Bring it to a boil and then let the mixture cook on medium heat for about five minutes. I don't mind having the seeds in there and having a bit of texture to the filling, so I don't bother with pureeing the raspberries and putting them through a sieve. If you don't like that, do those things before you add the cornstarch to your berry mixture. The mixture will start to thicken while it cooks. Once you take it off the stove, put it in a bowl and cover it with clingwrap, so no skin will be forming on top. Put in the fridge until use after it has cooled down a little.
5. For the egg glaze, simply mix an egg with a tablespoon of milk (mixing it with a fork will suffice). Put in the fridge until use.
6. For the cream cheese filling, just mix all of the ingredients together with an electric mixer. Put in the fridge until use.
7. Once your dough has risen for about 2 hours, deflate it, cover the bowl with clingwrap and put it into the fridge overnight.
8. The next morning, take the dough out of the fridge and let it warm up for about half an hour before taking it out of the bowl and kneading it for a couple of minutes.
9. Roll out the dough to a rectangle of about 20x40cm, about 1cm thick.
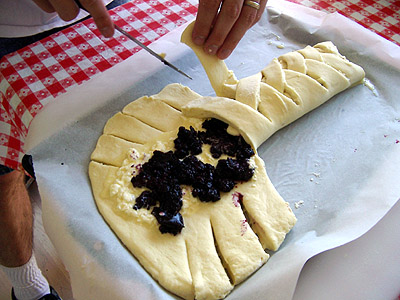
10. Spread first the cream cheese, then the raspberry filling on top of the dough - but be careful: we still need to braid the dough, so don't go overboard with the filling and only put it in the very center of the dough, taking up about 8 to 10cm in width!
11. Now slice the left and right side of the dough at an angle so you get tabs about 2 to 3cm wide. Start braiding the dough by folding over the tabs, alternating from side to side. (You can find a great photo of this step at The Fresh Loaf!)
12. When you're done, glaze the braid with the egg wash and let it rise for about 45 minutes in a warm place until it has about doubled in size.
13. Once it's risen, glaze again with egg wash and top with sliced almonds.
14. Bake on 175°C for about 35 to 40 minutes until it's golden brown.
15. Let the braid cool down for at least 30 minutes before slicing it. Dust with powdered sugar.
Enjoy!
♥ Nicole
2013/10/13
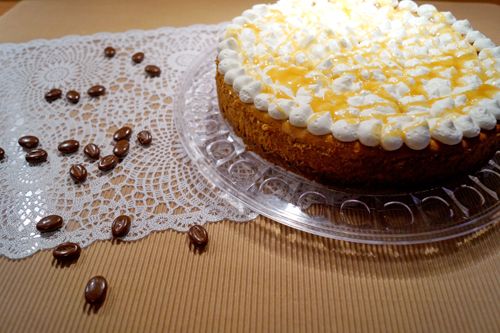
Coffee Toffee Cheesecake
Wow, I am really neglecting this blog, aren’t I? I’m sorry guys. But lately, I’ve had two jobs to deal with (and from next week on it’s kind of going to be three for a while) and so my free time is extremely limited. And it’s not even high season yet. So it’s only going to get worse. Had an extra-long weekend last week and I actually got my sewing machine out of its case on Saturday and after ruining three of the three things I was attempting to make, I gave up and put it back where I found it. So nothing new to look at on that front. Half-finished handbag (which is going to stay unfinished until Christmas at the rate I’m going) and two wonky pillow cases. Nothing to write home about. Or write a blog post about. My next free weekend will be sometime at the end of November I think (and that might change at the drop of a hat and be even later), so I expect to be tired, bleary-eyed and generally exhausted for the rest of the year. Plus, still trying to lose weight so I finally fit into my pants again, so baking isn’t really very conductive to that goal.
Nevertheless, I baked something this week, because it was a colleague’s birthday. As usual, I had to take crappy 7am pictures in the dark before I left for work that not even my shiny new toy (yes, I finally got a DSLR…that I’ve had no time to play around with or figure out yet) could really salvage. But you’re all used to that by now, so – whatever.
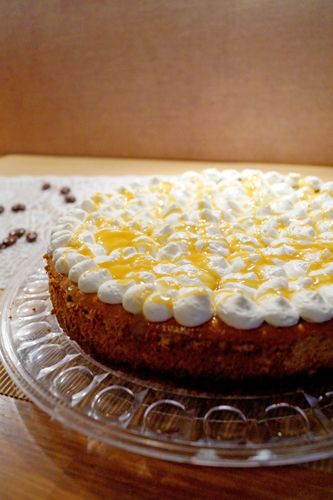
Anyway. Cake. As I’ve said before – I love cheesecake. Easy, quick, delicious, no matter what you do with it. I would’ve loved to make a peanut butter cheesecake, but since this particular colleague is allergic to nuts, I had to improvise a little. The result? Coffee Toffee Cheesecake. Which worked surprisingly well. The sweetness of the toffee was nicely set off by the not-too-sweet coffee flavor of the cake. I mainly used toffee because I still had it at home and wanted to use it up; alternatively, you can just as easily use caramel sauce and syrup instead of toffee sauce and syrup.
Coffee Toffee Cheesecake
For the crust
1 package of caramel cookies (I use Lotus Caramel Cookies, about 30 to 40 cookies; if you can’t find caramel, use Oreos and about 20 to 30 cookies)
about 50g butter, melted
100g toffee bread spread or syrup
For the cheesecake
600g cream cheese
200g sour cream
4 eggs
2 tps. vanilla extract
75g sugar
2 tbsp flour
2 tbsp instant coffee
1 tsp cinnamon
100ml toffee syrup
1. Line the bottom of a spring pan with parchment paper. Melt the butter and pour over the finely crushed cookies. Mix together with a fork or spoon until the cookie crumbs are really moist. [You can check if the crumbs have the right consistency by pressing some to the side of the bowl with the spoon or fork. If they stick easily, they're fine, if they fall right back down, add a little more butter]. Press the crumbs evenly to the bottom of the spring pan and put the pan into the fridge for 15 minutes.
2. Warm the toffee bread spread or syrup until it gets quite liquid and pour it over the cookie base. While the toffee cools down again, prepare the filling.
3. Dissolve the instant coffee in about 1-2 tbsp of hot water.
4. Put all the ingredients for the filling in a bowl and mix until smooth. Really, don’t worry about a right order or anything, just mix it all up. Pour the batter over the cookie crust.
4. Bake on 160°C for 75 minutes, then turn off the oven, open the door slightly and leave in the oven for another half hour or so.
5. Decorate as desired. (I piped some cream and drizzled toffee syrup on top.)
♥ Nicole
2013/09/10
Viennese Whirls
Just once when I go into my kitchen, I'd like things to go completely according to plan from start to finish. Really, just once. I'm not greedy. I have no idea how other people do it. I just know I seem to be completely incapable of producing something edible without some kind of drama while making it. Seriously, I know no one who has as much go wrong in the kitchen as I do all the time. What’s up with that?
Enter these littledrunk soldiers beauties. I saw the recipe a few weeks ago here and they immediately ended up on my "try asap" list. I've been looking for an excuse a reason to make them ever since. Fortunately, it's September. And September means a sh*t-ton of my friends have birthdays. Excuse found. Especially since I saw the friends I made them for only before their actual birthdays, so for obvious superstitious luck reasons, I couldn't make them cakes, so the cookies were perfect.
I’m pretty sure the moment I had that thought, Mr. Murphy was already rubbing his hands in anticipation. It all started out innocent enough, though. The recipe looked easy. I did everything it asked (which wasn't a lot), only when my dough was done, it looked nothing like it did in the original recipe, but it still looked alright-ish. So I decided to give it a try anyway and stuck it in my fancy new cookie press that I'd been dying to try out for a while. End result? Each cookie got stuck on the press and there was no way to get it off without completely squishing it to death. Seems like I had to modify the dough a little. I added more flour until it roughly seemed to resemble the dough in the original recipe. Put it back in the press, tried again - didn't really detach from the press either, but now if you tried, the cookie just fell completely apart and instead of a beautiful little flower, I had five separate petals.
I admit, by then, I was already pretty fed up, but I had to find a way to get the stupid cookies on the baking tray, so I ended up piping them with one of my real old piping tips (that is actually for making little dough baskets to be filled). Now at least they ended up where they were supposed to, but...well....let's just say "even" and "straight" they weren't. I baked them anyway because I really didn't have the patience to redo them again.
Fortunately, after the incident I call "melting moment-gate", I've learned to actually let cookies with a high flour ratio cool completely on the baking tray before I even look at them, so at least they all turned out alright and didn't fall apart after I took them out of the oven.
But when I started filling them, the problem with them being not very even and straight came back to haunt me. Because they were so lop-sided, they just slipped right back apart when I put them down. So I had to device a clever little plan of propping them all up against each other to try to keep them all mostly straight while the buttercream hardened. Which kind of worked. However, what was supposed to look like some sophisticated little British desert actually looked like a row of drunk soldiers.
So what do you do when your cookies look like drunk soldiers? Exactly, you deflect.
Look at the pretty flowers! And the colorful wrappers. LOOK!!!
Anyway. They tasted really nice, though. Crumbly and sweet and they just melted in your mouth. So let's not dwell on how they looked. At least they were a success taste-wise! And that's all that matters, right?
Viennese Whirls
Recipe adapted from Five Euro Food
For the cookies:
250g soft butter
350g flour
50g icing sugar
1 p. vanilla sugar
For the filling:
100g soft butter
100g icing sugar
1 tsp vanilla extract
5 tbsp jam (original calls for raspberry, I just redcurrant)
Cookies
1. Preheat your oven to 190°C
2. Put all the ingredients for the cookie dough in a bowl and mix with a hand mixer (you don't need a dough hook) until you get a smooth dough (take a bit and roll it to a ball - if it doesn't stick to your hands, it's fine).
3. Try your luck with a cookie press (flower inset). If that doesn't work out for you,welcome to the club put the dough in a piping bag and - using a tip with a large opening (e.g. a big star tip) - pipe circles of about 3cm in diameter on a baking tray. You only need to leave a little space between the cookies, they'll stay pretty much the size you piped them.
4. Bake for about 12 minutes or until the cookies start to slightly brown at the edges. Let them cool completely before removing them from the baking tray.
Vanilla Buttercream
1. Mix the butter, icing sugar and vanilla extract together using an electric whip until the ingredients are well-combined and the sugar has dissolved.
Assembly
1. Try to always match two cookies that are the same size.
2. Pipe a bit of buttercream on one cookie and a little dollop of jam in the middle of the other (not too much, though, or it will all come out on the sides when you put the cookies together).
3. Press them together slightly.
4. Let the buttercream harden and dust with icing sugar before serving.
Enjoy!
♥ Nicole
Enter these little
I’m pretty sure the moment I had that thought, Mr. Murphy was already rubbing his hands in anticipation. It all started out innocent enough, though. The recipe looked easy. I did everything it asked (which wasn't a lot), only when my dough was done, it looked nothing like it did in the original recipe, but it still looked alright-ish. So I decided to give it a try anyway and stuck it in my fancy new cookie press that I'd been dying to try out for a while. End result? Each cookie got stuck on the press and there was no way to get it off without completely squishing it to death. Seems like I had to modify the dough a little. I added more flour until it roughly seemed to resemble the dough in the original recipe. Put it back in the press, tried again - didn't really detach from the press either, but now if you tried, the cookie just fell completely apart and instead of a beautiful little flower, I had five separate petals.
I admit, by then, I was already pretty fed up, but I had to find a way to get the stupid cookies on the baking tray, so I ended up piping them with one of my real old piping tips (that is actually for making little dough baskets to be filled). Now at least they ended up where they were supposed to, but...well....let's just say "even" and "straight" they weren't. I baked them anyway because I really didn't have the patience to redo them again.
Fortunately, after the incident I call "melting moment-gate", I've learned to actually let cookies with a high flour ratio cool completely on the baking tray before I even look at them, so at least they all turned out alright and didn't fall apart after I took them out of the oven.
But when I started filling them, the problem with them being not very even and straight came back to haunt me. Because they were so lop-sided, they just slipped right back apart when I put them down. So I had to device a clever little plan of propping them all up against each other to try to keep them all mostly straight while the buttercream hardened. Which kind of worked. However, what was supposed to look like some sophisticated little British desert actually looked like a row of drunk soldiers.
So what do you do when your cookies look like drunk soldiers? Exactly, you deflect.
Look at the pretty flowers! And the colorful wrappers. LOOK!!!
Anyway. They tasted really nice, though. Crumbly and sweet and they just melted in your mouth. So let's not dwell on how they looked. At least they were a success taste-wise! And that's all that matters, right?
Viennese Whirls
Recipe adapted from Five Euro Food
For the cookies:
250g soft butter
350g flour
50g icing sugar
1 p. vanilla sugar
For the filling:
100g soft butter
100g icing sugar
1 tsp vanilla extract
5 tbsp jam (original calls for raspberry, I just redcurrant)
Cookies
1. Preheat your oven to 190°C
2. Put all the ingredients for the cookie dough in a bowl and mix with a hand mixer (you don't need a dough hook) until you get a smooth dough (take a bit and roll it to a ball - if it doesn't stick to your hands, it's fine).
3. Try your luck with a cookie press (flower inset). If that doesn't work out for you,
4. Bake for about 12 minutes or until the cookies start to slightly brown at the edges. Let them cool completely before removing them from the baking tray.
Vanilla Buttercream
1. Mix the butter, icing sugar and vanilla extract together using an electric whip until the ingredients are well-combined and the sugar has dissolved.
Assembly
1. Try to always match two cookies that are the same size.
2. Pipe a bit of buttercream on one cookie and a little dollop of jam in the middle of the other (not too much, though, or it will all come out on the sides when you put the cookies together).
3. Press them together slightly.
4. Let the buttercream harden and dust with icing sugar before serving.
Enjoy!
♥ Nicole
Abonnieren
Posts (Atom)